Setup Keycloak with an event provider
If a user register itself on the application a user in the Keycloak database is created. We've a user in our application too. To connect these two users we've to do the following steps.
Install an event provider in Keycloak
The first thing we've to do is to create an install an event provider inside Keycloak. This event provider listens on register events. When somebody register itself on the side this provider gets the event and can act depending on the typ of the event. If created a provider for that here.
The provider takes the following arguments as environment variables:
public static final String CLIENT_ID = System.getenv("KEYCLOAK_CLIENT");
public static final String REALM = System.getenv("REALM_NAME");
public static final String KEYCLOAK_URL = System.getenv("KEYCLOAK_URL");
public static final String APPLICATION_USER_NAME = System.getenv("APPLICATION_USER_NAME");
public static final String APPLICATION_PASSWORD = System.getenv("APPLICATION_PASSWORD");
public static final String APPLICATION_URL = System.getenv("APPLICATION_URL");
To create this provider we've to clone and build the project:
git clone https://github.com/robertBrem/KeycloakEventProvider
mvn clean package
The package command creates two jar files:
event.listener-jar-with-dependencies.jar and
event.listener.jar. We're going to use the
event.listener-jar-with-dependencies.jar file. This jar
contains all the needed dependencies.
Now we've to install this provider inside our Keycloak server. Therefore we've to update our Keycloak Docker image:
FROM jboss/keycloak:2.4.0.Final

MAINTAINER Robert Brem <brem_robert@hotmail.com>

RUN sed -i 's~<security-realms>~<security-realms><security-realm name="UndertowRealm"><server-identities><ssl><keystore path="/opt/jboss/keycloak/standalone/data/keycloak.jks" keystore-password="${env.KEYSTORE_PASSWORD}" /></ssl></server-identities></security-realm>~g' /opt/jboss/keycloak/standalone/configuration/standalone.xml
RUN sed -i 's~<server name="default-server">~<server name="default-server"><https-listener name="https" socket-binding="https" security-realm="UndertowRealm"/>~g' /opt/jboss/keycloak/standalone/configuration/standalone.xml

ADD event.listener-jar-with-dependencies.jar /opt/jboss/keycloak/providers/

ENTRYPOINT [ "/opt/jboss/docker-entrypoint.sh" ]
CMD ["-b", "0.0.0.0"]
It's important to copy the jar file in the same folder as the
Dockerfile.
I've already built this image and pushed it to my Dockerhub.
It's in the version 1.0.17. Now we've to update our
Keycloak Kubernetes deployment. We also have create two Keycloak
server one in our test namespace an the other one in our
production environment.
The deployment for the Keycloak in our test environment looks
like that:
apiVersion: extensions/v1beta1
kind: Deployment
metadata:
  name: keycloak
  namespace: test
spec:
  replicas: 1
  template:
    metadata:
      labels:
        name: keycloak
    spec:
      nodeSelector:
        name: vmi74389
      containers:
      - name: keycloak
        image: robertbrem/keycloak:1.0.17
        env:
        - name: REALM_NAME
          value: "battleapp"
        - name: KEYCLOAK_URL
          value: "https://disruptor.ninja:31182/auth/"
        - name: KEYCLOAK_CLIENT
          value: "battleapp-frontend"
        - name: APPLICATION_URL
          value: "http://disruptor.ninja:31080/battleapp/resources/users"
        - name: APPLICATION_USER_NAME
          valueFrom:
            secretKeyRef:
              name: application
              key: application_user_name
        - name: APPLICATION_PASSWORD
          valueFrom:
            secretKeyRef:
              name: application
              key: application_password
        - name: KEYSTORE_PASSWORD
          valueFrom:
            secretKeyRef:
              name: keycloak
              key: keystore_password
        volumeMounts:
          - mountPath: /opt/jboss/keycloak/standalone/data
            name: keycloakdata
        ports:
          - name: http
            containerPort: 8080
          - name: https
            containerPort: 8443
      volumes:
        - name: keycloakdata
          hostPath:
            path: /root/keycloakdata
I'm going to set the REALM_NAME, KEYCLOAK_URL,
KEYCLOAK_CLIENT and APPLICATION_URL environment directly,
all pointing to the corresponding test environment
endpoints.
We can delete KEYCLOAK_USER and KEYCLOAK_USER after
we've started the Keycloak server the first time. This is not
needed until we mount the Keycloak data on the host.
That we can use the application secret for the
APPLICATION_USER_NAME and the APPLICATION_PASSWORD we've
to create this secret in the test environment:
kctest create secret generic application --from-literal=application_user_name=rob --from-literal=application_password=1234
And the keycloak secret for the keystore password as well:
kctest create secret generic keycloak --from-literal=keycloak_user=rob --from-literal=keycloak_password=1234 --from-literal=keystore_password=1234
Now we can create this deployment in the test environment:
kc create -f deployment.yml
At next we've to create a new service for the Keycloak in the test environment:
apiVersion: v1
kind: Service
metadata:
  name: keycloak
  namespace: test
  labels:
    name: keycloak
spec:
  ports:
  - name: http
    port: 8883
    targetPort: 8080
    nodePort: 31181
  - name: https
    port: 8843
    targetPort: 8443
    nodePort: 31182
  selector:
    name: keycloak
  type: NodePort
And create it:
kc create -f service.yml
Now we've to do the same for the production environment.
Changes in the Keycloak console
To activate the user registration and our event provider we've
to make some changes in the Keycloak console. Login to
https://disruptor.ninja:31182/auth/ Administration Console
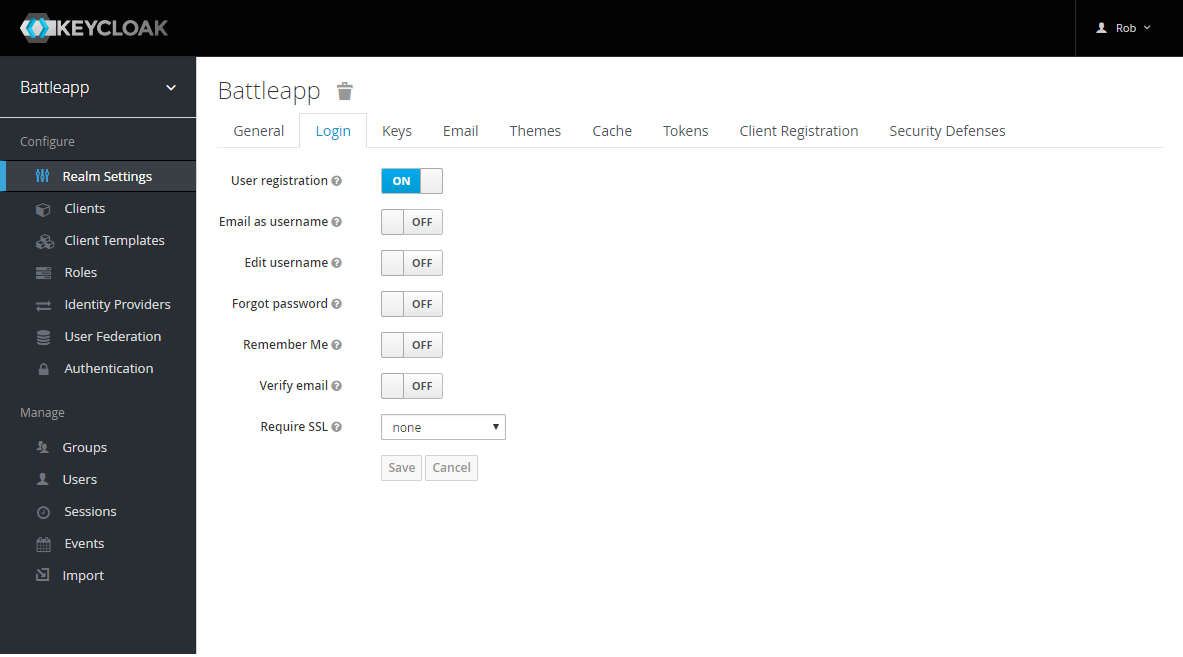
Select Realm Settings in the navigation and change to the
Login tab. Activate the User registration.
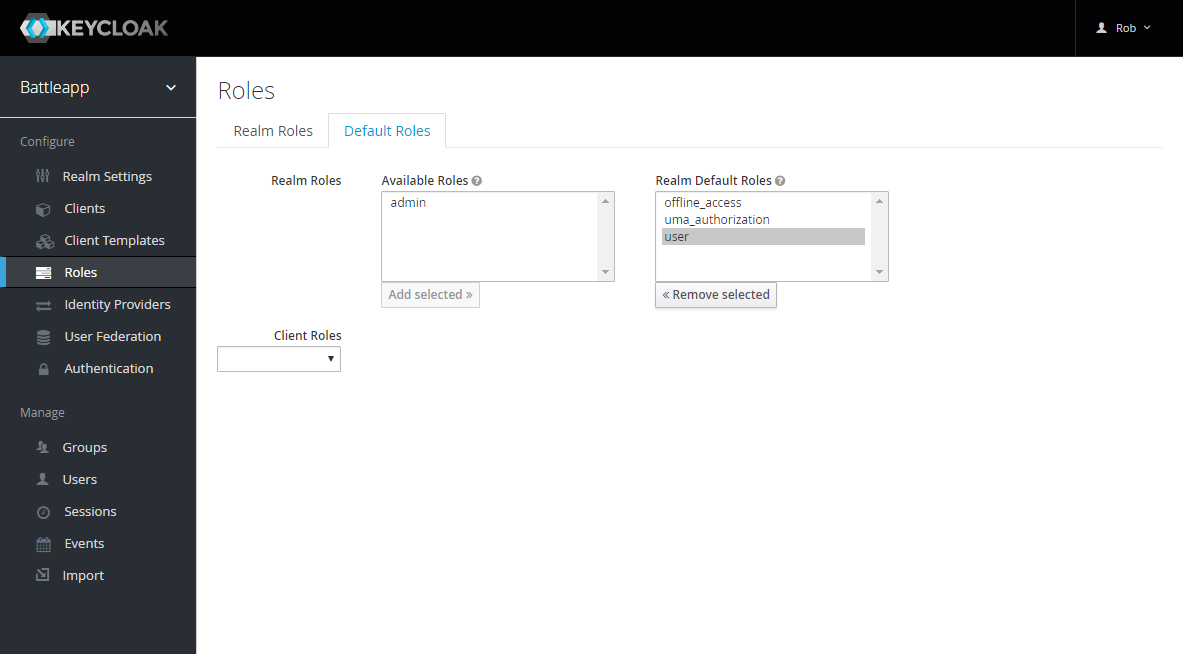
At next change to Roles in the navigation and to the
Default Roles tab. Now add user to the default roles.
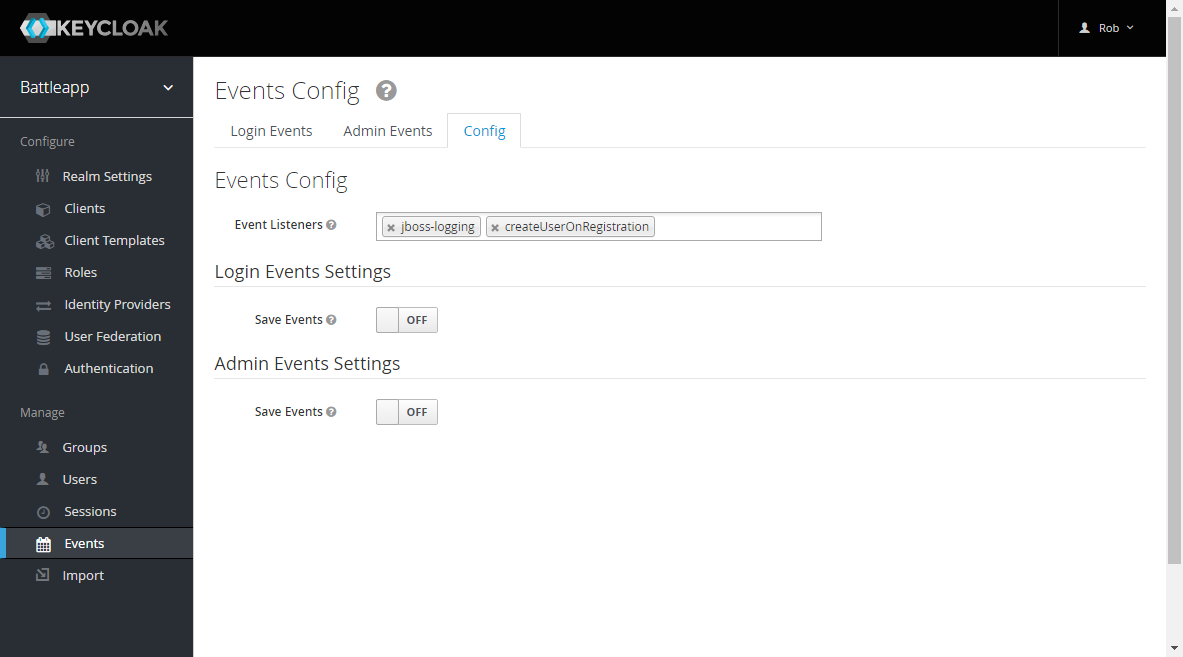
Finally change to Events in the navigation and to the
Config tab. Add createUserOnRegistration in the
Event Listeners field.
Now we've to do the same for the production environment.